How to install different types of smartphone screen guards
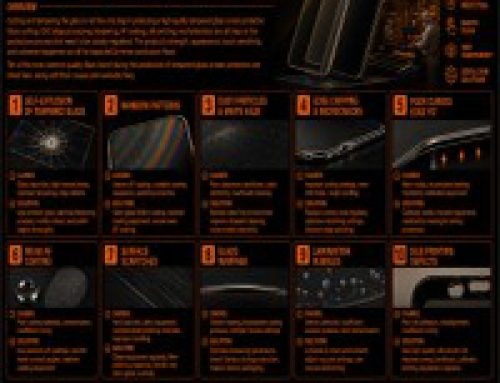
There is no doubt that having a smartphone is no big deal these days unless it gets scratched or damaged by some freak incidents. Smartphone makers these days always claim that their phones’ screens are well-equipped to confront any kind of adverse conditions. We also know that most smartphones these days feature great quality screens. Roles of mobile phones have changed over a period of time. From a mere communication device to a gadget of full entertainment it has come a long way. No can deny that Mobile phones are excellent entertainment devices as well as a great office work tool. However, even a single scratch on display can ruin the experience. You may hear many smartphones makers claiming that their devices are equipped with really good quality glass screen which can resist scratches but nothing is forever. At any point of time your phone can catch a scratch or damage to a certain extent. Because even after company’s claim of screen being shatter they are prone to some damage.
Applying or installing a good quality screen protector can solve your problem instantly. In this article we will try to explain how you can do it by yourself without taking anyone’s help.
We all know that there are different types of screen guards are available and we will discuss installation process of all the main types but our focus will be on tempered glass screen protector.
Problems during Installation
It is a known fact that installation process can be really irritating sometimes. It has been seen over the time that screen protectors for phones and tablets can be some of the most frustrating accessories to apply properly. Those who are applying it for the first time it seems virtually impossible for them to combine perfect placement, with removing every bubble. The worst and saddest part is that you just have one try to put it in a perfect way, or the screen protector is ruined completely. This instruction set however, will outline a fool proof method of applying a screen protector with little hassle, and leave you with a device 100% free of bubbles. This method works for any type of screen protector on the market, even tempered glass if that is a preference. Some screen protectors include instructions, and call for wetting the screen protector before application; however we have seen many people have found these awkward to install and prefer the method outlined by us.
Why is it important to install tempered glass screen protector over other screen guards?
The tempered glass screen protector fits like an extra layer on top of your phone’s display providing an additional layer of protection. It is more durable than plastic screen protectors, less prone to scratches and also keeps fingerprints away. Most importantly, a tempered glass can save your mobile’s screen from shattering if you drop it accidently. It’s a cost-effective way to protect your phone’s screen.
Installing a tampered glass is quite easy and here is how you can do it even at your home.
First Step- Finding the right place
This is what you all need to be very careful about. A place is important before you start your installation process as wrong place and surface may ruin your entire effort. You need to keep the phone on a flat and clean surface. This is to ensure that you get a good grip while applying the glass and keep dirt away. It is also advisable not to perform the installation near windows or under ceiling fans to avoid tiny dust particles settling between the screen and the tempered glass.
Second Step – Removing the old screen protector
Once you find a good place and placed your phone on a flat surface, it’s time to remove your old phone’s screen. To remove an old screen protector or a tempered glass on your phone, you can use any object as fine as a toothpick to slowly release the old screen guard. Once you push the pointed end of the toothpick towards any edge of your old tempered glass, it should come off without breaking into pieces.
Third Step- Cleaning the glass surface
To clean the screen, use the rubbing compound and microfiber cloth bundled in the box. Gently rub the screen with a microfiber cloth and look closely for any dust particles. Most tempered glass bundle dust-absorber stickers which can be used to remove minute dust particles.
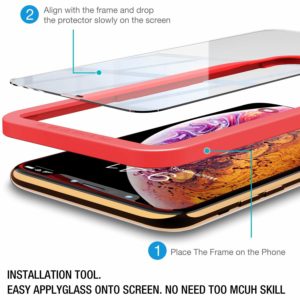
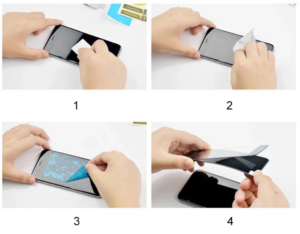
Fourth Step – Applying the screen protector with Applicator Frame.
After having a clean and clear display, align the tempered glass with applicator installation frame as a guide on top of your phone. You can take the earpiece of your device as a reference point to align the glass properly. Once you have the top section aligned, remove the plastic film at the back of the tempered glass and guide it, so it can stick to the display.
Fifth Step – Check out for bubbles or dust particles
You cannot rest until you see there is no bubble once your installation is complete. If you find a single bubble, however small it can be your effort is ruined. There are instances where, you may notice some bubbles between your screen and the tampered glass. To remove these bubbles, press the bubble spot on the glass towards the edges of the screen using a microfiber cloth. You can also use a hard or flat object such as a credit card to do this process. You may have to repeat this process until to get a bubble-free screen. We advise you to turn off your device so you can see these bubbles clearly.
Having a tempered glass on your mobile is really an affordable and easy way to protect your phone’s screen. It saves you the trouble of spending thousands on screen replacements. Moreover, it keeps your phone’s screen clean, protected and also adds to the re-sale value of the phone.
If you are looking for high-quality tempered glass for your phone, you can shop it online at different portals like amazing or Alibaba. On the other hand you can also walk-in to nearest Reliance Digital store buy one and our experts will install tempered glass free-of-cost for you.
Plastic ScreenGuard Installation
There are two types of plastic screen guards Polyethylene Terephthalate (PET) and Thermoplastic Polyurethane (TPU) which is a soft plastic that is awkward to install.
But all the steps are same as tempered glass screen protector installation.
.
Nano Liquid:
This is another screen protector (as per the makers) which is selling in a big way. Although we don’t prefer you to use this one but as another form of screen we would like you to know about it and the procedure. According to the maker’s claim you can protect your phone by erasing the phone’s solution and then cleaning it. While this layer can provide some additional protection level, it is too thin and can easily scratch the actual screen, contrary to the screen protector’s purpose.
Also, it cannot be removed and replaced with another screen protector. Most products say you cannot remove it, but it will gradually wear out over time. This makes testing difficult as you cannot just scrape off the product. Therefore, the permanence of these protectors makes it hard to compare and recommend.
Conclusion: As a user of smartphone it is really important to know how to install different types of screen guards. In this article, we have described all major types of screen guard installation but we will advise you to go for tempered glass screen protector as it will secure your smartphone in a much better way. Knowing the technique of screen guard installation will help you save time and your phone will be secured.